Best Techniques for Using SEM-02 with SCO01 Concealer for Flawless Coverage
- Admin

- Aug 21, 2021
- 3 min read
Updated: Feb 5, 2025
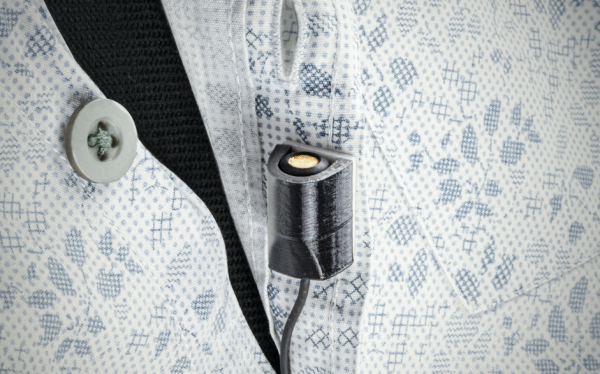
SCO01 concealer is an accessory for SEM-02 to hide the microphone behind the talent's clothing, unlike the ALC01 alligator clip, which tends to reveal the microphone.
The ALC01 alligator clip is attached to the clothing, with the microphone positioned outside the clothing. The use of such clip-ons is typically for broadcasts or interviews where hiding the microphone is not necessary. However, if the video being produced requires that the microphone not be visible in the frame (for example, in films), then hiding the microphone becomes a primary concern.
However, the rustling sound from the clothing is often recorded, which can be quite disturbing to the final audio output. Therefore, it is important to pay close attention before starting to record to ensure that the sound of the clothing is not overly disruptive, as it is impossible to avoid it 100%, especially if the talent's movements are too extreme.

The SCO01 Microphone Concealer is not only intended to facilitate hiding the microphone from the camera's view but also to minimize the rustling sound from clothing/costumes.
The use of SCO01 tends to be flexible and not bound by specific issues, but what needs to be considered is the level of microphone visibility on the camera and the audio outcome at the point of attachment.
Here are some tips we can offer to maximize the use of this SCO01 microphone concealer:
1. Attach the mic to the chest


Placing the mic in the chest area tends to be a common practice. Besides being relatively easy, quick, and hidden, the audio outcome in this position tends to be natural even though the source of sound (mouth) or the talent's head moves to the right and left. If the talent wears a relatively thin costume/closet (T-shirt, shirt, etc.), then the sound integrity will remain good.
However, if the wardrobe used is relatively thick (jackets, sweaters, or other thick materials), it will cause the clarity/clearness to diminish. This can be countered by providing an EQ boost on mid-high frequencies on the transmitter (if available). Or you can also perform an EQ boost during post-production.
2. Place the mic on the shirt collar

The mic can be hidden under the right/left collar depending on the position of the talent's head. The result is a better SNR, as it's closer to the sound source. However, if the talent faces the opposite direction, the clarity and integrity of the sound will drop significantly.
So make sure the talent follows the script!
3. Place the mic on the tie
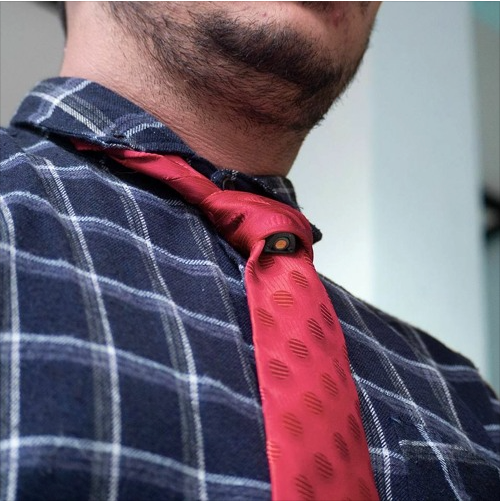
If the talent wears a wardrobe with a tie, then choosing to place the mic on the tie is very appropriate.
The sound characteristics are almost similar to the mic position on the chest, with captures tending to be natural and not changing much even though the sound source/mouth moves. However, there's a slight coloration of sound because the mic capsule does not face the sound source (facing downward).
4. Create a "loose knot/ Strain relief" or a strain relief loop on the cable


The purpose of creating a strain relief loop as shown in the picture is to provide more room so that the mic cable can extend if the talent moves to an extreme position (for example, from crouching/squatting then standing upright). In addition, the strain relief loop can also slightly dampen the low-frequency rumble vibrations that propagate through the cable to the mic capsule.
First, create a knot about 3cm below the microphone, and add tape to secure it. Without this knot, it is very possible that when the talent moves extremely, the lavalier mic will come off due to the cable being pulled.
For more details, please watch the video below:
These are some tips from us to maximize the use of SCO01.
*Want to ask about this topic? Please send an email to support@seruniaudio.com


Comments